 SECTIONS
Setting up Cash Entry Extension
In addition to the base managed package for the Accounting application, Certinia supplies an extension package that gives you an alternative user interface when creating, editing and viewing Certinia cash entries: Certinia Cash Entry Extension (ffcash).
We recommend that you are logged in as System Administrator to perform the configuration and customization tasks described here. You must not use the standard System Administrator profile to enter data into a Certinia application. This restriction is related to the ability of the application to work across multiple companies and currencies.
Entering data into the application is more suited to people in your organization with accounting and finance experience and accountant-level user permission.
Prerequisites
This is an optional installation that you must do after you have completed the installation, deployment and licensing of the latest Accounting package. You cannot install this package independently.
Post all "In Progress" cash entries before installing the extension package, either for the first time or as an upgrade.
Installing the package
Follow the steps for installing the latest managed packages as described in the Salesforce documentation.
On the "Choose Security Level" page, we recommend that you grant Full Access to each profile that you use with Accounting.
During the procedure you must provide the organization's log-in details. The package itself is not password-protected and so you do not need to provide an additional password after log in.
Once logged in, you are given the opportunity to review the package contents to ensure this is the package you want to install. When you click Install, all the components in the package are installed to the selected organization.
You do not need to deploy or license this extension package after installation.
Post-installation tasks (fresh install)
There are two post-installation tasks that you must perform:
- Remove the standard button overrides on the Cash Entry custom object.
- Assign the newly-installed document user interface page layouts to your profiles.
And one optional task that depends in your organization's requirements:
- Edit the field set associated with document data-entry grid at line item level.
Remove button overrides
To remove the standard button overrides on the Cash Entry custom object:
- From Setup, click Create | Objects.
- Click the name of the Cash Entry custom object.
- Scroll down to the Standard Buttons and Links section.
- Click Edit next to the View button.
If the Standard Salesforce.com Page option is already selected, you may have a customized view page layout. In this case, use the standard Salesforce page layout editor to add the Manage Lines, Classic View and Classic Edit buttons to your customized page layout. If in doubt, contact Certinia Customer Support for advice.
- If not already selected, click the Standard Salesforce.com Page radio button.
- Click Save.
- Repeat for the Edit and New buttons.
See "Overriding Standard Buttons and Tab Home Pages" in the Salesforce CRM Help for more information.
Assign page layouts
To assign the relevant layouts to your profiles:
- From Setup, click Create | Objects.
- Click the name of the Cash Entry custom object.
- Scroll down to the Page Layouts section.
- Click Page Layout Assignment.
- Click Edit Assignment.
- Select the profiles that you want to edit.
- Select the (ffcash) page layout from the drop-down list.
- Click Save.
- Repeat for the Cash Entry Line Item object.
Edit field sets
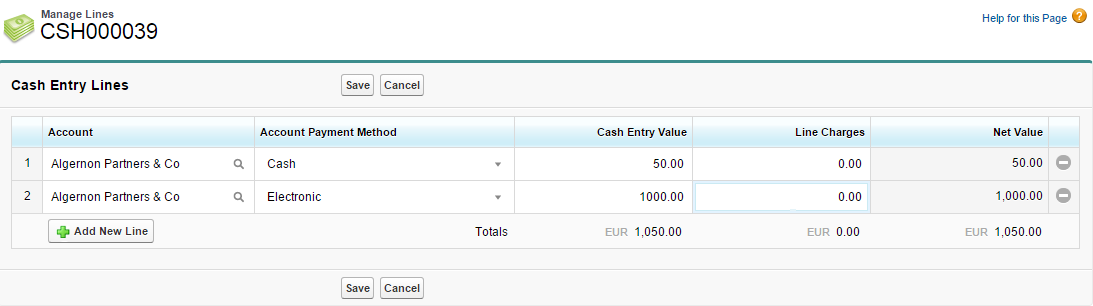
In this "extended" user interface, field sets are used to enable you to add and arrange custom fields in a Manage Lines data entry grid. A Manage Lines grid is a Visualforce page like this:
To add a custom field to a field set:
- Navigate to the field set list of the appropriate object. From Setup, click Create | Objects, and select detail object from the table.
- Scroll down to the Field Sets section.
- Click Edit next to the field set that you want to edit.
- To add fields to the field set, drag the fields from the object palette and drop them into the Available for the Field Set or the In the Field Set container. The fields in the Available for the Field Set container are not initially visible on the Visualforce page. The fields within the In the Field Set container are visible by default on a Visualforce page.
- To move a field between the lists, drag and drop a field from one container to the other. The vertical order of the In the Field Set list indicates the order of how the fields render on Visualforce pages. See the Salesforce Help for more information.
- Click Save.
Packaged Field Set for Cash Entry Line Item
Here is a list of the fields in the packaged field set for Cash Entry Lines. Do not remove any of these fields from the field set.
- Account (c2g)
- Account Payment Method (c2g)
- Cash Entry Value (c2g)
- Bank Account Value (c2g)*
- Line Charges (c2g)
- Net Value (c2g)
* Only appears when the cash entry currency is different from the bank account currency, but must be included in the field set.
Uninstalling the package
To uninstall an extension package, follow the instructions in the Salesforce documentation.