To check if actuals are correct, you can verify them using the Actuals Verifier. If there are differences between actuals, you can:
- Correct the differences manually, and then verify actuals
 Totals for a given time period. again.
 - Recalculate the actuals for a specific project A collection of activities and related items to be managed over a defined time range, such as timecards, expenses, milestones and budgets. or resource A contact that works on a project., if the differences are only found for that project or resource. See Recalculating Resource and Project Actuals.
- Delete all actuals and recalculate them.
Verifying Actuals
Before verifying actuals:
- Schedule downtime and notify users when PSA is to be unavailable.
- If PSA is configured to calculate actuals in scheduled mode, unschedule existing scheduled batch jobs that process transaction delta A record of an unprocessed transaction that has been queued for processing. records and actuals Totals for a given time period.. Make a note of the processes so that you can reschedule the jobs when finished verifying actuals.
- If PSA is configured to calculate actuals in scheduled mode, process any unprocessed transaction deltas.
To verify actuals: (Pilot)
- On the PSA Administration page, click Actuals Verification | Actuals Verifier. The Actuals Verifier (Pilot) tab opens.
- If there are unprocessed transaction deltas and the actuals are unlocked, click Process Transaction Deltas on the Unprocessed Transaction Deltas page and check the processing status.
- When the processing is complete, you can start the actuals verification process on the Start Actuals Verification Process page. Click Lock Actuals before starting the process.
- After clicking Lock Actuals, pause any scheduled jobs that process transaction deltas on the Pause Transaction Delta Processing Jobs page. You must pause these jobs before clicking Continue.
- [Optional] If you want to exit the verification process, click Exit and Unlock Actuals. This unlocks your actuals and opens the Resume Transaction Delta Processing page, where you resume the paused transaction delta processing jobs.
- [Optional] You can keep a track of the verification process by hovering over the progress bar available on each page.
- Click Continue. The Select Verification Scope page opens.
- Select the scope for the verification:
- Select Region, Practice, Group, Project, or Resource.
- Select a time period. If you want to include all time periods between the start and end dates of the selected objects, select the checkbox Include all time periods between the start and end date.
- [Optional] In the Time Period lookup field, enter a search term and press Enter.
For all the lookup fields, you can also click Show All Results for “ ”. The search lookup window opens with the searched string populated in the Search field and displays all related items in the grid.
Select the item from the grid that you want and click Select. The selected item is then displayed in the lookup field. For more information, see Using Advanced Lookup.
- Click Start Actuals Verification and check the processing status.
- When the processing is complete, the results are displayed on the Actuals Verification Results page.
- If there are no differences, you can either exit the verification process or try again with another verification scope:
- Click Exit and Unlock Actuals.
- Click Delete, to delete the previously calculated verification actuals. Once the deletion process is completed, you are directed to the Unlock Actuals page.
- Click Unlock Actuals. This unlocks your actuals and navigates you to the last step where you resume the paused transaction delta processing jobs on the Resume Transaction Delta Processing page.
- Click Finish, to exit the process.
- Or click Select Another Verification Scope. The deletion process of the previously calculated verification actuals starts. When it has been completed, the Select Verification Scope page opens, where you can select another verification scope.
If there are differences, the Discrepancies page opens, where you can see the number of differences identified, the scope you selected, and the common reasons for the differences:
- To check the differences, scroll down to the Discrepancies section and filter by selecting a value from the verification scope drop-down list, and a time period from the Time Period lookup. Click Apply, the results are displayed according to your filters.
- Click Reset, to reset the filters to their default values.
- Select an option:
- If you think your actuals can be affected by any of the common reasons for differences, exit the verification process by clicking Exit and Unlock Actuals to revert the steps before fixing.
- To help investigate the differences, you can reduce the records by clicking Select Another Verification Scope.
- As a last resort you can delete and recalculate all actuals by clicking Prepare Org to Delete Actuals.
- If there are no differences, you can either exit the verification process or try again with another verification scope:
- Depending on the option you select perform the following steps:
- If you want to exit and unlock actuals.
- Click Exit and Unlock Actuals.
- Click Delete, to delete the previously calculated verification actuals. Once the deletion process is completed, you are directed to the Unlock Actuals page.
- Click Unlock Actuals. This unlocks your actuals and navigates you to the last step where you resume the paused transaction delta processing jobs on the Resume Transaction Delta Processing page.
- Click Finish, to exit the process.
- If you want to select another verification scope.
- Click Select Another Verification Scope. The deletion process of the previously calculated verification actuals starts. When it has been completed, the Select Verification Scope page opens, where you can select another verification scope.
- Go back to step 11 and repeat the steps to follow the process.
- If you want to delete and recalculate all actuals.
- Click Prepare Org to Delete All Actuals.
- Click the following triggers to disable them using the configuration options in the ASM Triggers configuration group:
- handleRegionTrigger.RegionalActualsChange
- handlePracticeTrigger.PracticeActualsChange
- handleGroupTrigger.GroupActualsChange
- handleProjectTrigger.ProjectActualsChange
- handleResourceTrigger.ResourceActualsChange
- Click Delete all Actuals from Org, read the warning message carefully.
- Click Delete. This takes time depending on the data in your org.
- Once the deletion is complete, the Recalculate Actuals page opens. Click Recalculate Actuals. This takes several hours, depending on the data in your org.
- Once the recalculation is completed, the Unlock Actuals page opens.
- Click Unlock Actuals. This unlocks your actuals and opens the Resume Transaction Delta Processing page where you resume the paused transaction delta processing jobs.
- Click Finish.
- If you want to exit and unlock actuals.
Using Classic or Visualforce pages
To process unprocessed transaction deltas:
- Click the Actuals Verifier tab.
- If there are unprocessed transaction deltas, click Process to process them.
To verify actuals:
- In the Actuals Verifier tab, click Lock Actuals.
- Select the scope for the verification:
- Select Region, Practice, Group, Project or Resource. If you want to verify actuals for all projects or resources, select the Include all projects or Include all resources checkbox.
- Select the time period. If you want to include all time periods between the start and end dates of the selected objects, select the checkbox.
- Click Check Verification Scope. You can only verify 10,000 records.
If you have too many records and you selected Global Region, or the Include all projects or Include all resources checkboxes, try selecting a single option to return fewer results.
- Click Start Verification. The Verification Results are displayed.
- To view the differences:
- Click the link in the results text.
- Review the highlighted differences in the table.
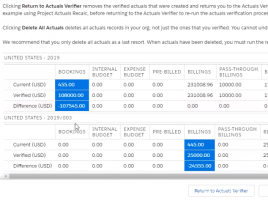
- If there are no differences, or if you want to resolve the differences later:
- Click Return to Actuals Verifier.
- Click Unlock Actuals.
- If PSA is configured to calculate actuals in scheduled mode, reschedule the batch jobs that you unscheduled earlier.
- Notify users that PSA is available again.
- To view the differences:

Deleting Actuals
To delete all actuals and recalculate them:
- If you previously verified actuals but then removed the verification actuals, verify actuals again on the objects and time periods on which you suspect there to be inconsistencies.
- If PSA is configured to calculate actuals in scheduled mode, disable the following triggers using the configuration options in the ASM Triggers Automated Services Manager Triggers. ASM triggers execute certain behavior in PSA. ASM triggers are controlled by the fields in the Triggers custom setting and the configuration options in the ASM configuration group. configuration group A collection of configuration options contained in the configuration groups tab that defines behavior of a PSA object or feature.:
- handleRegionTrigger.RegionalActualsChange
- handlePracticeTrigger.PracticeActualsChange
- handleGroupTrigger.GroupActualsChange
- handleProjectTrigger.ProjectActualsChange
- handleResourceTrigger.ResourceActualsChange
- Click Delete All Actuals.
- Click Calculate All Actuals. This takes several hours depending on the data in your org.
- Enable the triggers in the ASM Triggers Automated Services Manager Triggers. ASM triggers execute certain behavior in PSA. ASM triggers are controlled by the fields in the Triggers custom setting and the configuration options in the ASM configuration group. configuration group that you disabled earlier.
- Click Unlock Actuals on the Actuals Verifier tab.
- Notify users that PSA is available again.
- Do one of the following, to copy all new actuals values to their parent region, practice, group, project or resource:
- Use the Data Loader to select the Action: Update Current Time Period checkboxes and clear the Time Period fields on the region, practice, group, project or resource.
- Schedule the RPGPRMaintenanceSchedule Apex class with start and end dates in the near future.
- If PSA is configured to calculate actuals in scheduled mode, reschedule the batch jobs that you unscheduled earlier.