Entering data in a FinancialForce application is like entering data in any web page.
As you enter and edit data, remember to click Save so you do not lose your changes. If your organization has enabled inline editing, you can edit fields directly on some, but not all, detail pages.
Classic Edition, Extended Edition, Custom Input Forms
There is a choice of user interfaces when creating, editing and viewing sales invoices, sales credit notes, payable invoices, payable credit notes, cash entries and journals.
Classic Edition The view of the application that you see when you first install the base managed package. is the default, but your System Administrator may have configured the Extended Edition
 The view of the application that you see when you install one of the extension packages (such as the Cash Entry Extension package). For invoices, credit notes, and journals Extended Edition is integrated into the main package, but must be configured. for some or all of these document types. The FinancialForce Accounting Help explains procedures in both Classic and Extended user interfaces.
If your System Administrator has enabled custom input forms for some or all of these document types, how you create, edit and view documents might differ from what is described in the FinancialForce Accounting Help. Contact your System Administrator for assistance.
Data Entry Grids
Data entry grids are a feature of Extended Edition The view of the application that you see when you install one of the extension packages (such as the Cash Entry Extension package). For invoices, credit notes, and journals Extended Edition is integrated into the main package, but must be configured..
See Data Entry Grids for more details.
See Editing Field Sets for a description of how to edit a Manage Lines grid.
Expander Panels
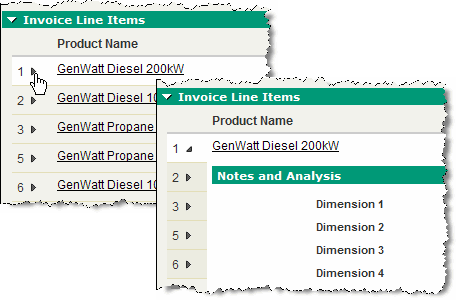
Expander panels are a feature of Classic Edition The view of the application that you see when you first install the base managed package..
 Tell me more
Some FinancialForce pages in Classic Edition The view of the application that you see when you first install the base managed package. have expander panels that are initially hidden when the page is loaded. These panels allow you to enter, and subsequently view, additional attributes of the related field or line item, such as further analysis or a line description.

The following buttons indicate the availability of, and enable access to, an expander panel related to the adjacent field or line item.
| Button | Description |
|---|---|


|
Displays an expander panel Panels that are initially hidden when the page is loaded. They allow you to enter, and subsequently view, additional attributes of the related field or line item, such as further analysis or a line description. that is hidden and closes any other panels that are open. Blue indicates existing content. Panels that are initially hidden when the page is loaded. They allow you to enter, and subsequently view, additional attributes of the related field or line item, such as further analysis or a line description. that is hidden and closes any other panels that are open. Blue indicates existing content. |


|
Hides the selected panel. |


|
Indicates an error on the related expander panel. If hidden, click to show the item in error. |
Dates
To enter a date:
- Put your cursor in the date or date/time field on an edit page.
- Choose a date from the calendar that opens, or manually enter a date in the format defined by your user locale.
- [Optional] Enter a special date value, such as "Tomorrow" or "Friday".
See "Entering Dates and Times" in the Salesforce Help for more details.
- Entering Dates and Times
- Entering Currencies
- Entering Phone Numbers
- Selecting Picklist Values